
How to Prepare a Lightweight Backcounty Ski Repair Kit
Words & Photos by Ambassador Luc Mehl
Hyperlite Mountain Gear ambassador Luc Mehl is an Alaskan native who is no stranger to the snow and skiing. His infatuation with the backcountry started at a young age as he grew up in a remote Alaskan town surrounded by raw wilderness. Years later he was on track for a PhD at MIT, but ended up leaving with a masters in order to further pursue adventure back in Alaska. Mehl has completed month-long wilderness trips in America’s most northern state each year for five years, ranging from 150 to 370 miles, as well as six Alaska Mountain Wilderness Ski Classics, ranging from 120 to 200 miles. During these extreme events he has had many boots, skis, bindings and poles all fail. So in keeping with his ultralight philosophies, Mehl developed a system for creating a lightweight backcountry ski repair kit. In this post, he explains how he balances the weight and thoroughness of his kit.
At the end of an unsupported 180-mile ski traverse in Alaska’s rugged Brooks Range, Rob Kehrer showed me his repair kit. Rob and I worked from different ends of the spectrum, I cut too many corners to save weight (“Can we carry just share one crampon between us?”), and he carried too many extras (down booties, beer). Rob had a crooked grin on his face as he pulled out the repair kit… the standard stuff, duct tape, wire, but also spark plugs and wrenches. He’d brought the wrong repair kit, leftover from a snowmachine trip.
I’ve benefited from learning from Rob’s and my own mistakes, and have been especially fortunate to have mechanical engineers and a ski builder in my core group of partners. This guide is my effort to pass on repair kit strategies, tried and true, while keeping weight to a minimum.
Part of trip planning is risk assessment, and that extends down to the repair kit.
General principles:
Risk assessment
How big of a deal will equipment failure be? We carry different supplies for an overnight trip (close to the road system) than for a month-long trip in deep wilderness. The repair kit components are arranged in order of what I’d carry for a single day (top) to items that I’d only justify for longer or more remote trips (bottom).
Variety
Everyone carries their own repair kit, and we talk about what we have so that there isn’t too much overlap. The wider variety of repair materials, the more likely you can make a successful and creative repair.
Equipment
Know what equipment your partners have (brand of binding, type of boot, etc.), and carry bits that are appropriate for all brands (hex-wrenches for ice axes, torx bits for Dynafit bindings, pozi-grip for traditional ski mounts, etc.)
Stay organized
I keep different repair kits for different activities (packrafting, skiing, biking) so that it is easy to grab the right kit for the day. On longer trips, I combine components from each repair kit.
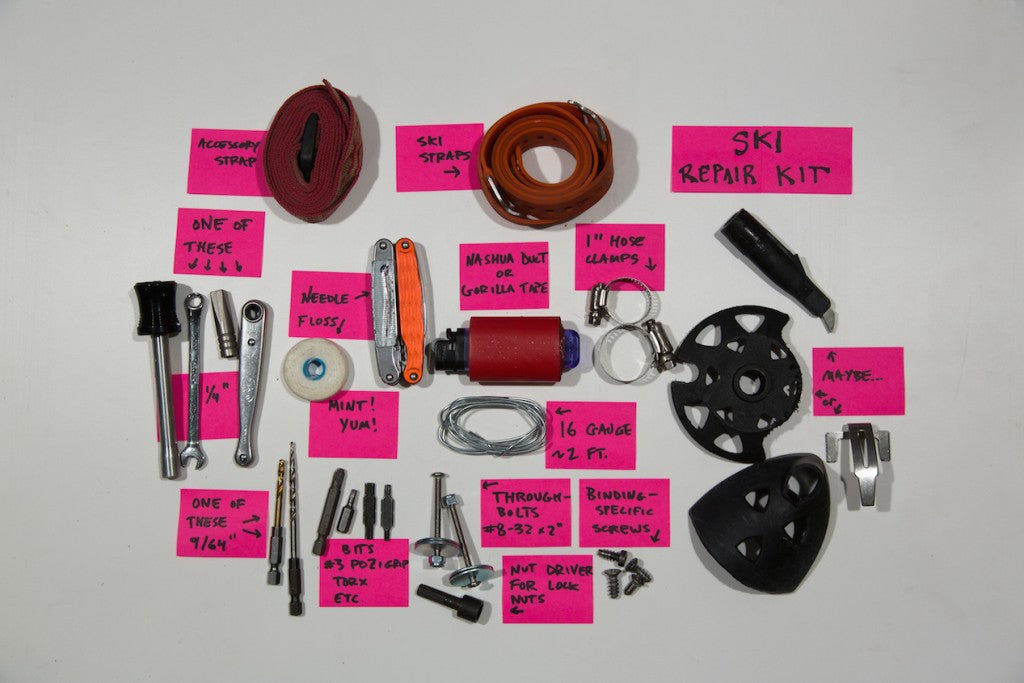
Ski repair kit:
- Ski/Pole straps: 2+ long Pole Straps (also known as “Voile ski strap”). These are solid gold. We’ve used these to repair broken skis, bindings, boots, poles and pole-baskets. You really can’t have enough. Everyone in the group should carry at least two. They make an easy-access and nice mid-pole grip if you strap them around the ski pole.
- Multi Tool: I carry the Leatherman Juice because of its lightweight, but when we actually needed to do a ski repair, it couldn’t handle the torque. We had one heavy-duty Leatherman for the team, and needed it. For a big and/or remote trip, someone should carry a heavyweight, full-sized multi-tool. Ideally the tool will have a bit-driver and file. The file can be used to cut through metal edges and sharpen edges if conditions get icy.
- Bit-driver: You can buy an accessory bit-driver for most multi-tools. I use Leatherman’s removable bit driver. You could also consider a ¼” nut driver, or ¼” open-end wrench, but those options weigh more.
- Bits: Check the hardware on your bindings and carry the appropriate bits. For example, you might need torx bits for Dynafit bindings, and a #3 pozi-drive screws (you can see narrow notches at 45º to the standard phillips head notches) for all standard ski binding screws.
- Skinwax: When you don’t have it and you are carrying several pounds of extra snow on each skin, you might find yourself getting desperate… we’ve tried the waxy rinds on cheese and smoked salmon oil. Don’t do it. Just bring the damn wax.
- Binding hardware: spare binding screws, mounting screws, bolts, and any other hardware that fit your bindings.
- Stiff steel wire: approximately 2 ft.
- Drill bit: We carry a 9/64th drill bit in case a binding rips out and needs to be re-mounted. Like this option, but without the (removable) countersink attachment. If the entire length of the bit has grooves, you could save weight by filing it down to ~9.5mm. Otherwise (with a tapered bit like the one in the link) you will need the full length and have to drill through the entire ski.
- Through-ski hardware: Machine screws, washers, and bolts that will fit a 9/64th hole (a snug fit is okay, you might have to thread the bolt through the hole) in case you either want to bolt a snapped ski back together (overlap the broken pieces and drill through both, ski straps also work) or need to through-bolt a binding rip-out. Be sure to carry a nut driver that fits the bolt. You could use wing-nuts for a through-ski repair, but the wingnuts won’t work well for a binding mounting.
- Hose clamps: 1 or 2 1” hose clamps for ski pole repairs (ski straps also work)
- Pole tip: If you expect to run into much ice, an extra tip will be worth its weight in case yours breaks. Use your stove or a fire to re-activate the glue on the old tip. You don’t need additional glue to get the new tip on (but a nub of hot-gun glue is easy to include in your repair kit).
- Pole basket: The basket can be held on with ski straps above and below.
- Tail clip
- Spare bindings: For our long trips, we carry, and have used, a complete extra toe-piece and parts for the heel-piece. The toe is the priority.
